COMBINED ARMY:
________________________________________________________
________________________________________________________
199/200 points | 4/4 swc
open with Aleph Toolbox
(note that I changed my Lt. at the last minute from the Shrouded to one of the Morat Vanguard Infantry)
HAQQISLAM:
________________________________________________________
________________________________________________________
(note that the Husam SpecOp has a Holo Device that allows him to disguise himself...he is likely posing as one of the Ghulam)
200/200 points | 4/4 swc
open with Aleph Toolbox
Map Rules:
-Walls are ARM 10 STR 3. Destroying a wall replaces it with a 1" square rubble counter.
-Doors are ARM 5 STR 2. Destroying a door removes it from play.
-Individual Doors may be bypassed by Hacking them or by an Engineer. Their BTS is -3.
-Computer Terminals allow a Hacker to open or close any doors on the board with a single short hacking skill. Computer Terminals are BTS -3.
-Parachutists may only enter from board edges with "openings".
-Combat Jump may only occur in the large central room, which is the only place big enough for an unobstructed template.
YAMS:
I drew Ambush, which forced my son to reveal Flag Kill. That gave me (Combined Army) an immediate victory point unless he managed to kill my flag (an extremely difficult mission in the maze of the mining complex).
I also drew the card that lets me take orders off a dead body. I also drew Hold and Sight at least 75% of the enemy, these are among the easier mission cards (especially for Morat).
My son drew the card that lets him saboutage a central terrain piece (I know this because he mistakenly tried to do it in the first turn; he can only do it in the second). I don't know what his remaining two cards are yet.
We forgot to place both the crate and the civilian; hopefully neither of my son's cards require them. So far, we've played one and a half turns.
Initiative:
Haqqislam FAILS with an 18. Combined Army SUCcEEDS with a 3. Combined Army decides to go first. Haqqislam chooses its side and forces Haqqislam to deploy first.
Deployment:
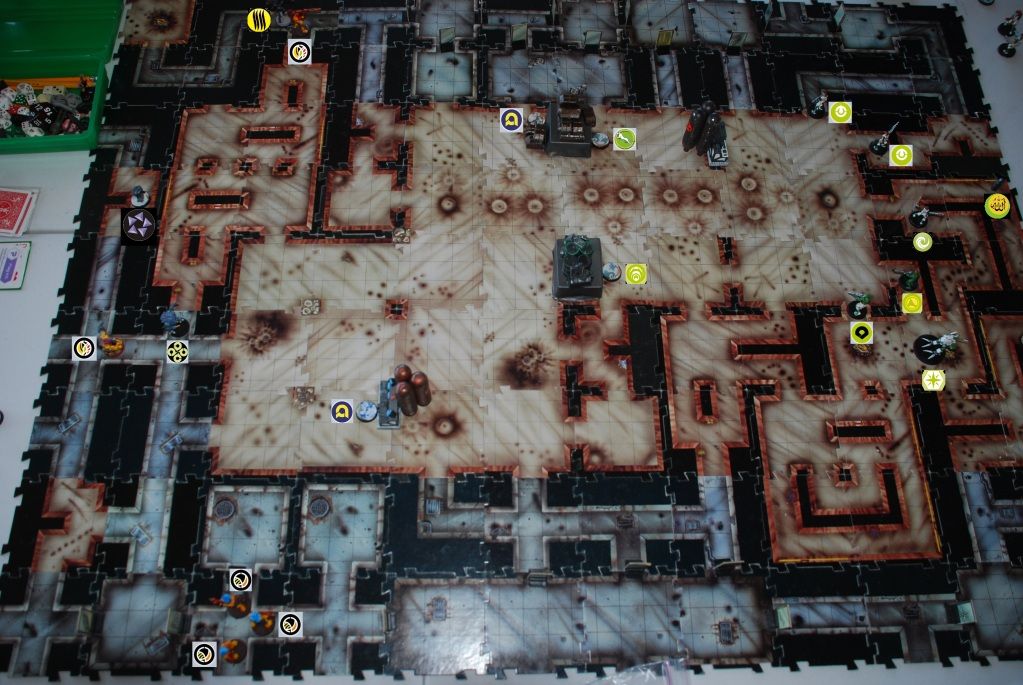
Combined Army deployed three Morat Vanguard Infantry armed with Combi Rifles to push its right flank through the maze-like corridors.
Combined Army deployed the Daturazi Witch Soldier to charge the central room and provide smoke for the Vector Operator to control said room with its HMG.
Combined Army deployed the Kurgat with boarding shotgun and Ikadron Batroid with dual flame throwers to protect its left flank's maze-like corridors.
Combined Army infiltrated the Malignos Hacker behind the closer Computer Terminal and the Shrouded behind the left flank stack of crates.
Haqqislam deployed the Hassassin Barid Hacker in a corridor within line of fire of the closer computer terminal.
Haqqislam deployed both Ghulam on its right flank guarding the central room.
Haqqislam deployed the Djanzaban and the Azra'il on the left flank guarding the room.
Haqqislam deployed its Minesweeper baggage bot in the rear with the gear.
Haqqislam infiltrated the Hawwa' Forward Observor behind the stacked drums on its left flank in the central room.
Haqqislam infiltrated the Hunzakut behind the stacked crates on its right flank in the central room.
Combined Army, Turn 1:
The Daturazi Witch Soldier used its impetuous order to move into the central room and throw smoke.
The Malignos Hacker came out of camouflage and successfully hacked the computer terminal (required an 11-). The Malignos opened several doors on the Combined Army Right flank, allowing the Morat Vanguard Infantry to push forward.
The Morat Vanguard Infantry used several orders to push forward down the right flank, the Lieutenant taking up the rear.
The Vector Operator took advantage of the Witch Soldier's smoke and used several orders to rush into the central room and take up a position behind the nuclear core attached to the closer computer terminal.
Haqqislam, Turn 1:
The Hassassin Barid successfully fired a Marker adjacent to the closer computer terminal (needed a 15-).
The Hassassin Barid successfully hacked the closer computer terminal through the Marker (needed an 11-). The Barid closed all but one doors on its left flank, seperating the two lead Morat from their lieutenant, and opened a passage on the right.
The Bashi Bazouk entered the table on the forward right, moving quickly through the doors the Hassin Barid had just opened.
The Bashi Bazouk used several orders to move straight into the central room. The Malignos fired in reaction, destroying one of the Bashi Bazouk's holo echoes. The Bashi Bazouk didn't return fire, and instead ducked into a side corridor. There he re-activated his holo echoes. He charged back into the central corridor, where the Malignos successfully knocked out another holo echo. The Bashi Bazouk kept charging, reaching the opposite side of the computer terminal. The Malignos fired again, this time targeting the Bashi Bazouk himself, instead of the holo echo. The Bashi Bazouk returned fire.

In a hail of bullets the Malignos was killed and the Bashi Bazouk was left standing (Bashi Bazouk rolled two crits on a 5). The Malignos left behind a seed embryo while the Bashi Bazouk planted an E/Mauler. The Bashi Bazouk then retreated behind a pillar in the central room and re-activated his holo echoes.
Combined Army, Turn 2:
The Witch Soldier impetuously ran toward the Bashi Bazouk, throwing smoke.
The Vector Operator buzzed his wings, flew to the top of the nuclear core, and survived the E/Mauler's burst. He then fired his machinegun at the Bashi Bazouk. He split the fire with two bursts going at the first holo echo and two going at the second, which turned out to be the real Bashi Bazouk. The Bashi Bazouk returned fire but was cut down by the HMG's withering fire (hit twice). The Bashi Bazouk made one armor save and was knocked unconscious.

The Vector Operator took return fire from a distant Ghulam, but he needed a 2 and missed.
The lead Morat Vanguard Infantry then continued to push forward on the Combined Army right flank, using several orders to reach the central room on the Haqqislam side of the table. He used a Discovery action to successfully reveal the Hunzakut (needed a 10-).
The Vector Operator pushed up behind the stacked oil drums, this time getting fried by the E/Mauler. His HMG was still operable, however, so lept up over the drums, and sent a burst of machinegun fire at the newly-revealed Hunzakut. The Hunzakut returned fire, but couldn't prevail against the high-caliber machinegun. The Hunzakut took two wounds and was killed.
The Vector Operator took two shots of return fire, however. The first was the same Ghulam. He again needed a two and again missed. But he also took return fire from the Hawwa' hiding behind the same stacked drums the Vector was jumping over. The Hawwa' used Armor Piercing rounds to kill the Vector.

The Daturazi Witch Soldier then continued to charge the Bashi Bazouk's dead body, using the previously thrown smoke to approach safely. He successfully retrieved important documents from the Bashi Bazouk (required a 10-), gaining another Victory Point for the Combined Army.

END PART I